Easy Pipe Cleaner Christmas Tree Ornament Craft for Kids. A colorful, simple, and joyful DIY Christmas craft for home or classroom fun!
The holiday season can get wonderfully busy, full of decorating, baking, and making memories. So when you need a creative activity that’s quick, low-mess, and full of holiday cheer, this pipe cleaner Christmas tree ornament is just perfect!
With only a few basic materials (most you might already have at home), kids can create their own sparkling little trees to hang on the Christmas tree, give as a gift to grandparents or teachers, or decorate the classroom. Turn on some Christmas music, pour some hot cocoa, and enjoy this easy, happy craft together.
By using this site, you agree to our privacy policy and terms of use. This article contains affiliate links. Please read our full disclosure here.

How to make Christmas tree ornaments from pipe cleaners
Why You’ll Love This Craft
- Quick and easy: Simple steps that even young kids can follow.
- Budget-friendly: Uses just a few inexpensive craft supplies.
- Flexible: Works great for home, classroom, or craft parties.
- Creative: Kids can mix colors, add beads, and design their own trees.
- Develops fine motor skills: Twisting and threading beads is great for little hands.
- DIY Pipe Cleaner Christmas Tree Ornament
- Fun Christmas Tree Craft for Kids
Craft Supplies Pipe Cleaner Christmas Tree Ornaments
You only need a few items to make these colorful, sparkly Christmas trees:
- Green or white pipe cleaners (sparkly or plain)
- Colorful beads (5–8 mm), For example, these pearl beads to make sure the holes are small enough that they don’t slip off
- Yarn or twine, for hanging
- Scissors

DIY Christmas Tree Ornament for Kids
How to make a Christmas tree ornament from pipe cleaners
Step 1: Choose Your Tree Style
Gather your supplies and decide whether you’d like to make a green tree or a snowy white Christmas tree. Both are adorable! You can find Christmas-colored pipe cleaners in most craft stores or online. For example, on Amazon you can buy the green colored pipe cleaners and the white colored pipe cleaners. As well as sparkling/glitter pipe cleaners, great for a Christmas craft party!
Step 2: Cut the Branches
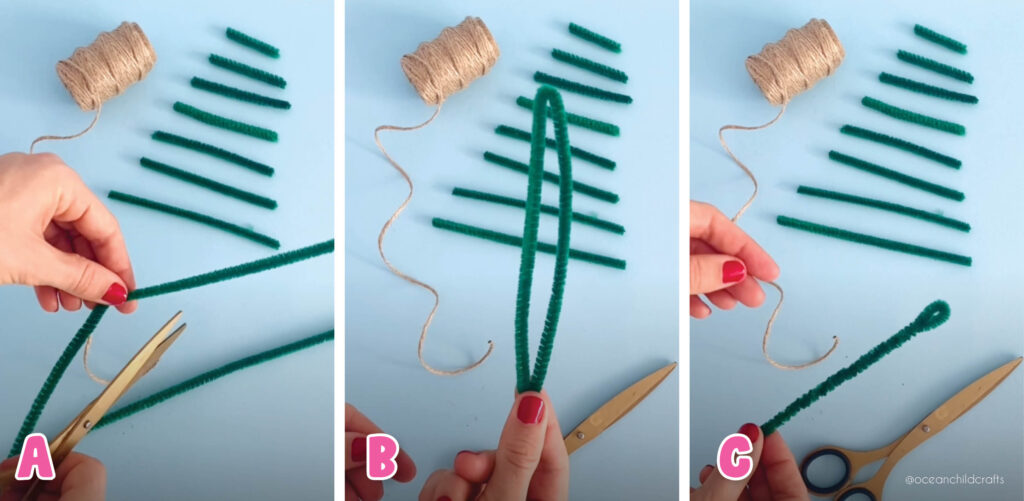
To build your tree, you’ll need eight smaller pipe cleaner pieces for the branches and one long piece for the trunk.
Cut your horizontal branch pieces to the following lengths:
4.5 in, 4 in, 3.5 in, 3 in, 2.5 in, 2 in, 1.5 in, and 1 in (11.5 cm to 2.5 cm).
These will form the layered look of your Christmas tree.
Tip: Lay them out from smallest to largest before starting, it helps kids see the shape of the tree come together, see images A, B and C above!
Step 3: Make the Christmas Tree Trunk
Take a new pipe cleaner (about 12 inches / 30 cm long) and fold it in half. Leave a small loop at the top, this will later hold your hanging string. Twist the rest of the pipe cleaner together to form your trunk. See images B and C above.
Step 4: Add the Hanging Loop
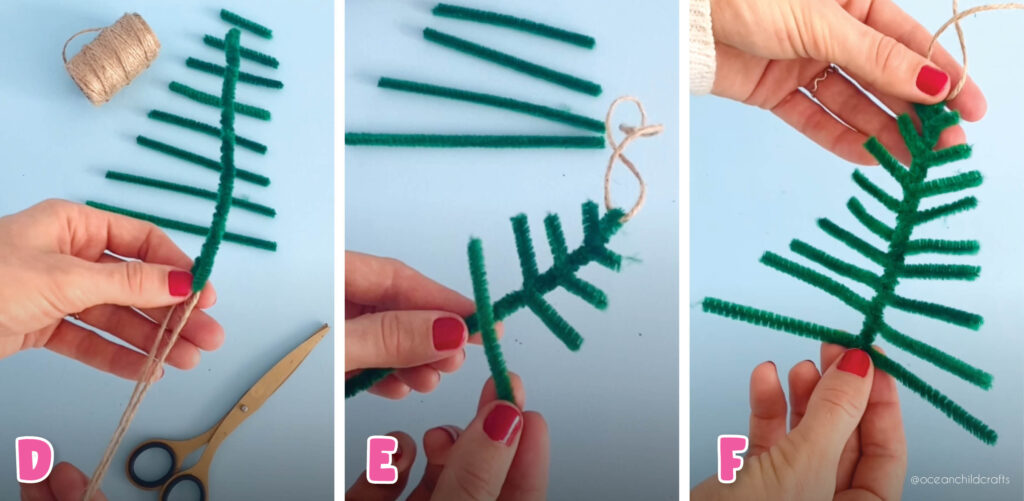
Cut a 10-inch (25 cm) piece of twine and thread it through the top loop. Tie a simple knot so you can hang your finished ornament later. See images C and D for reference.

DIY Christmas Ornament Gift Idea
Step 5: Attach the Branches to your Christmas Tree
Now it’s time to build your tree!
Starting from the top, twist the smallest branch around the trunk once or twice to secure it in place, see image E above.
Move downward, adding each branch about half an inch apart until you reach the bottom.
You’ll start to see your Christmas tree take shape. See image F above!
Parent tip: Younger kids might need a little help twisting the branches tight enough, but don’t worry if it’s imperfect; it just adds to the charm.
Step 6: Add Colorful Beads
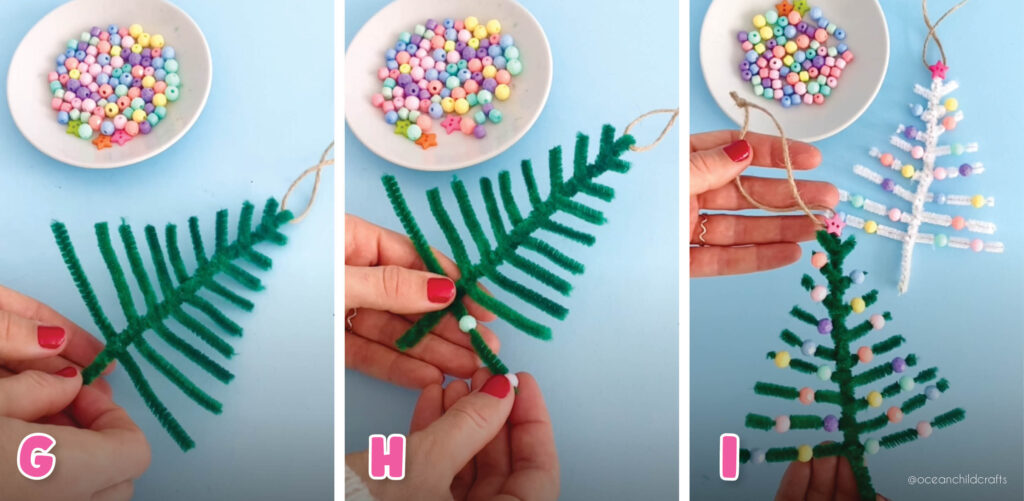
Decorate your tree by threading beads onto each branch. These can be Christmas lights, ornaments, or candy decorations!
We used bright, pastel beads for a fun look, but you can choose traditional red, gold, and green or pearled beads for a classic vibe. See images H and I below!
Step 7: Top It Off!
Add a star button, sequin, or sparkly bead to the top of your tree. You could even use a paper star glued on top for a simple finishing touch. Please take a look at the image I below.
And that’s it, your cheerful pipe cleaner Christmas tree ornament is ready to hang!

Tips, Tricks & Variations
- Use white sparkly pipe cleaners for a snowy tree effect, the colors of the beads really pop!
- Try silver or gold pipe cleaners for a more elegant version.
- Use tiny pom-poms instead of beads for a fuzzy look.
- For younger kids, pre-cut the pipe cleaners and use large-hole beads to make threading easier.
- Want a classroom activity? Let each child make one tree and hang them together on a class garland!
DIY Christmas Tree Ornament Gift Idea
These handmade trees make adorable little gifts for teachers, friends, or family.
Attach one to a wrapped present, or write a small name tag and use it as a place card on your Christmas dinner table.
Simple, personal, and full of holiday spirit!
Classroom Christmas Tree Craft Idea
This project is perfect for classroom crafts because it’s:
- Low-prep: Only 3–4 materials needed.
- Mess-free: No paint or glue required.
- Inclusive: Works well for a range of ages (even preschoolers).
You can even turn it into a math or pattern activity by having students create repeating bead color patterns on each branch.
- Christmas Tree Ornament Craft
Final Thoughts
Crafting during the holidays is about more than just decorations; it’s about slowing down, connecting, and creating something beautiful together.
These pipe cleaner Christmas trees capture that spirit perfectly: colorful, simple, and made with love.
So grab your beads, twist some pipe cleaners, and let the Christmas crafting magic begin!
Share your creations with us on Instagram, tag #OceanChildCrafts so we can see your beautiful trees!

More Fun Christmas Crafts?
Want even more Christmas craft inspiration? Don’t miss our blog post with 28 fun and easy Christmas crafts for kids, packed with creative ideas for all ages.
Looking for more fun Christmas crafts to keep kids creating? Bring a little extra magic to your holiday season with our BIG Christmas Craft Printable Bundle, designed for kids ages 5–8. Inside you’ll find festive templates, coloring pages, and easy craft projects that make Christmas crafting simple and fun. Everything is low-prep and ready to go, print and start creating. Perfect for both the classroom and home, this bundle helps spark imagination and joyful learning all season long. Find it now on Teachers Pay Teachers or in our Etsy craft printables shop.
Enjoy crafting, and have a happy holiday season!
 How to Make a Pinecone Squirrel with a Paper Roll (Easy Kids Craft!)
 Egg Carton Christmas Craft for Kids: Make a 3D Santa and Winter Frames
 Easy & Fun Origami Paper Fish Craft for Kids With YouTube Tutorial
 Easy Paper-Quilling Christmas Tree Ornaments For Kids!


Do you just twist the beads to stay on including the star or they just stay on? Thanks for the craft!